

Streamedian is a Javascript library which implements RTSP client for watching live streams in your browser that works directly on top of a standard HTML <video> element. It requires support of HTML5 Video with Media Sources Extensions for playback. Player also relies on server-side websocket proxy for retransmitting RTSP streams to browser.
It works by muxing RTP H264 and AAC payload into ISO BMFF (MP4) fragments.
Streamedian is written using ECMAScript 2015 standard.
!Not supported in iOS Safari and Internet Explorer.
Only player sources
npm install git://github.com/Streamedian/html5_rtsp_player.git
Attach HTML Video with RTSP URL
<video id="test_video" controls autoplay src="rtsp://your_rtsp_stream/url"></video>
or
<video id="test_video" controls autoplay>
    <source src="rtsp://your_rtsp_stream/url">
</video>
You can ignore source by passing data-ignore="true":
<video id="test_video" controls autoplay>
    <source src="natively_supported_video_url" data-ignore="true">
    <source src="rtsp://your_rtsp_stream/url">
</video>
If browser can play that source, player will not be initialized for this element.
Include compiled script into your HTML:
<script src="free.player.3.1.js"></script>
<script src="libde265.js"></script>
The "free.player.3.1.js" and "libde265.js" files are in the "HTML5 RTSP player" archive. Follow the link to download "HTML5 RTSP video player"
Setup player in your js:
if (window.Streamedian) {
    var playerOptions = {
        socket: "ws://localhost:8088/ws/",
        redirectNativeMediaErrors : true,
        bufferDuration: 30,
    };

    player = Streamedian.player("test_video", playerOptions);
}
Player is composed of three main modules: transport, client and remuxer.
Transport is responsible for data delivery and data queuing. It should fire connected, disconnected and data events. As soon as data is received, transport should push it into dataQueue and fire data event. Base class for transport can be found in core/base_transport. WebsocketTransport that relies on websocket proxy is implemented by default.
Client listens for data events, parses it into elementary stream packets and enqueues parsed data into its own queue. Client can pass queued buffer to remuxer with samples event. To identify stream track client should fire tracks event. When ready, flush event can be used to construct media fragment and pass it to video presenter. Base class for client can be found in core/base_client. Default client is RTSP client over websocket transport.
Remuxer prepares media fragment for video presenter and pushes it. There is only media source extensions based video presenter available at the moment. Remuxer collects data into mp4 media fragments (moof+mdat) and passes it into source buffer.
You install proprietary proxy server for streaming RTSP over websockets and free RTSP Player on your PC.
We recommend to choose "Service + NGINX web server" option in the installer for testing of our software. It allows you to launch the RTSP Player in your default browser by double-clicking on the "Streamedian Player URL.lnk" file on your desktop.
Then you can set an RTSP link, for example: rtsp://<your local PC's IP address>:554/h264, and watch RTSP stream in your browser. You can type your own RTSP source URL in the text field.
If you will change ws_rtsp.ini or wsp.lic files, then be sure that you save it in UTF8 encoding.
1. Turn off your firewall. 2. Find the "localhost" string in the "index.html" file and replace it with an actual IP of the PC, where the Proxy server was installed and launched.
socket: "ws://localhost:8088/ws/",
The file is located here:
C:\Users\Public\Documents\Streamedian\WS RTSP Player\nginx\html\index.htmlNote: Example code uses webserver Nginx which forwards all requests from 8088 port to websocket proxy server 8080 port. Change port number in socket address from 8088 to 8080 to connect player to websocket server directly. Websocket proxy port also maybe changed in "ws_rtsp.ini" file.
In general, it is necessary to use the valid license file for Proxy to connect Proxy and HTML5 RTSP Player (in global or local networks). With valid license file you can use proxy for private and open networks according to your project architecture.
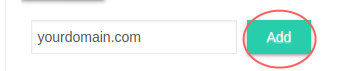
During license activation you have to set an IP address or domain name where your web page with HTML5 RTSP Player is deployed. Subdomains will be allowed, for example <your subdomain>.streamedian.com is allowed if you will registry the license for streamedian.com
Note for developers and researchers - how to work for free
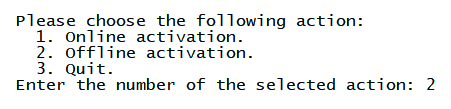
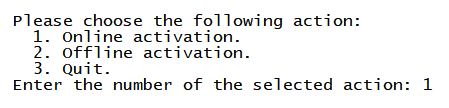
C:\Program Files\Streamedian\WS RTSP Proxy Server\activation_app.exe2. Enter "2" and press Enter to select offline activation. If machine info file is generated successfully, then you'll see a message with this file location
 3. Go to the personal cabinet (www.streamedian.com/cabinet)
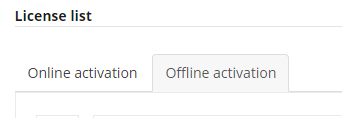
4. Choose "Offline activation" tab
3. Go to the personal cabinet (www.streamedian.com/cabinet)
4. Choose "Offline activation" tab
 5. Select the key which you're going to activate
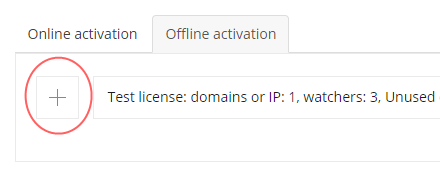 6. Upload "machine_info.bin" file
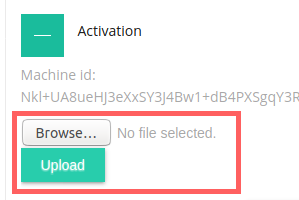 7. Enter domain name or IP address of the player host
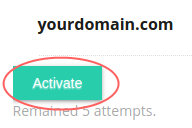
 8. Click "Activate" button
 9. Download the ws.lic file
 10. Copy the wsp.lic file here:
 C:\Users\Public\Documents\Streamedian\WS RTSP Proxy Server\wsp.lic11. To restart service with new license run:
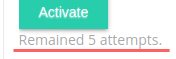
C:\Program Files\Streamedian\WS RTSP Proxy Server\restart_service.batPlease note that each key can be activated only limited amount of times. The number of remaining activation attempts can be seen by selecting a license in your personal cabinet.
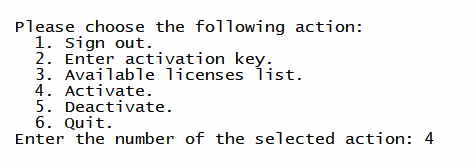
C:\Program Files\Streamedian\WS RTSP Proxy Server\activation_app2. Enter "1" and press Enter to select online activation
 3. Log into Streamedian account using the same login and password you used for registration on the website
 After successful login, you can see the list of all available licenses and their parameters by selecting "Available licenses list"
 5. Select the key from the list
 6. Enter your domain or IP address
 The license file will be uploaded to your server automatically and placed in the license proxy folder. The proxy will be restarted.

1. Uninstall previous version of Streamedian WS RTSP Proxy Server.
2. Download DebugView.zip. Unpack it and launch DbgView.exe. You will need to accept the License Agreement. DebugView is an application of a wholly owned subsidiary of Microsoft Corporation.
3. Install the new Streamedian WS RTSP Proxy Server.
4. Reproduce the issue.
5. Watch logs in DebugView
You install proprietary proxy server for streaming RTSP over websockets and free RTSP Player on your PC. Current package installs configuration files for the NGINX and Apache web servers.
We recommend to install the NGINX web server as the easiest way to test our software. To install NGINX web server, please type in the Terminal:
sudo apt install nginx
It allows you to launch the RTSP Player in your default browser by typing "localhost:8088" (without quotes).
Then you can set an RTSP link, for example: rtsp://<your local PC ip address>:554/h264, and watch RTSP stream in your browser. You can type your own RTSP source URL in the text field.
The configuration file is placed here:
/etc/ws_rtsp.ini
If you will change ws_rtsp.ini or wsp.lic files, then be sure that you save it in UTF8 encoding.
If you would like to use the Apache web server for testing, then just type in your browser "localhost:8088" (without quotes). If you have installed the Apache web server after this package, then please type in the Terminal:
sudo a2enconf ws_rtsp_proxy_stream.conf
sudo service apache2 reload
1. Turn off your firewall. 2. Find the "localhost" string in the "index.html" file and replace it with an actual IP of the PC, where the Proxy server was installed and launched.
socket: "ws://localhost:8088/ws/",
The file is located here:
/var/www/ws_rtsp_proxy/index.htmlNote: Example code uses webserver Nginx which forwards all requests from 8088 port to websocket proxy server 8080 port. Change port number in socket address from 8088 to 8080 to connect player to websocket server directly. Websocket proxy port also maybe changed in "ws_rtsp.ini" file.
In general, it is necessary to use the valid license file for Proxy to connect Proxy and HTML5 RTSP Player (in global or local networks). With valid license file you can use proxy for private and open networks according to your project architecture.
During license activation you have to set an IP address or domain name where your web page with HTML5 RTSP Player is deployed. Subdomains will be allowed, for example <your subdomain>.streamedian.com is allowed if you will registry the license for streamedian.com
Note for developers and researchers - how to work for free
/usr/bin/wsp/activation_app2. Enter "2" and press Enter to select offline activation. If machine info file is generated successfully, then you'll see a message with this file location
3. Go to the personal cabinet(www.streamedian.com/cabinet)
4. Choose "Offline activation" tab
5. Select the key which you're going to activate
6. Upload "machine_info.bin" file
7. Enter domain name or IP address of the player host
8. Click "Activate" button
9. Download the ws.lic file
10. Copy the wsp.lic file here: /usr/share/wsp/wsp.lic11. To restart service with new license run:
/usr/share/wsp/restart_service.shPlease note that each key can be activated only limited amount of times. The number of remaining activation attempts can be seen by selecting a license in your personal cabinet.
/usr/bin/wsp/activation_app2. Enter "1" and press Enter to select online activation
3. Log into Streamedian account using the same login and password you used for registration on the website
After successful login, you can see the list of all available licenses and their parameters by selecting "Available licenses list"
5. Select the key from the list
6. Enter your domain or IP address
The license file will be uploaded to your server automatically and placed in the license proxy folder. The proxy will be restarted.
You install proprietary proxy server for streaming RTSP over websockets and free RTSP Player on your PC.
The simplest way of testing of our software would be the following:
1. Run the script /usr/share/wsp/nginx/nginx_setup.sh. It will install the NGINX web server and setup your environment.
2. Open a web browser on some PC in your local subnet. And type "IP_ADDRESS:8088", where 'IP_ADDRESS' is IP of the PC, where the proxy server was installed.
3. Then you can set an RTSP link, for example: rtsp://<your's local PC ip address>:554/h264, and watch your RTSP stream in your browser. You can type your own RTSP source URL in the text field.
The configuration file is placed here:
/etc/ws_rtsp.ini
If you will change ws_rtsp.ini or wsp.lic files, then be sure that you save it in UTF8 encoding.
If you would like to use the Apache web server for testing, then just type in your browser "localhost:8088" (without quotes). If you have installed the Apache web server after this package, then please type in the Terminal:
sudo a2enconf ws_rtsp_proxy_stream.conf
sudo service apache2 reload
1. Turn off your firewall. 2. Find the "localhost" string in the "index.html" file and replace it with an actual IP of the PC, where the Proxy server was installed and launched.
socket: "ws://localhost:8088/ws/",
The file is located here:
/var/www/ws_rtsp_proxy/index.htmlNote: Example code uses webserver Nginx which forwards all requests from 8088 port to websocket proxy server 8080 port. Change port number in socket address from 8088 to 8080 to connect player to websocket server directly. Websocket proxy port also maybe changed in "ws_rtsp.ini" file.
In general, it is necessary to use the valid license file for Proxy to connect Proxy and HTML5 RTSP Player (in global or local networks). With valid license file you can use proxy for private and open networks according to your project architecture.
During license activation you have to set an IP address or domain name where your web page with HTML5 RTSP Player is deployed. Subdomains will be allowed, for example <your subdomain>.streamedian.com is allowed if you will registry the license for streamedian.com
Note for developers and researchers - how to work for free
/usr/bin/wsp/activation_app2. Enter "2" and press Enter to select offline activation. If machine info file is generated successfully, then you'll see a message with this file location
3. Go to the personal cabinet(www.streamedian.com/cabinet)
4. Choose "Offline activation" tab
5. Select the key which you're going to activate
6. Upload "machine_info.bin" file
7. Enter domain name or IP address of the player host
8. Click "Activate" button
9. Download the ws.lic file
10. Copy the wsp.lic file here: /usr/share/wsp/wsp.lic11. To restart service with new license run:
/usr/share/wsp/restart_service.shPlease note that each key can be activated only limited amount of times. The number of remaining activation attempts can be seen by selecting a license in your personal cabinet.
/usr/bin/wsp/activation_app2. Enter "1" and press Enter to select online activation
3. Log into Streamedian account using the same login and password you used for registration on the website
After successful login, you can see the list of all available licenses and their parameters by selecting "Available licenses list"
5. Select the key from the list
6. Enter your domain or IP address
The license file will be uploaded to your server automatically and placed in the license proxy folder. The proxy will be restarted.
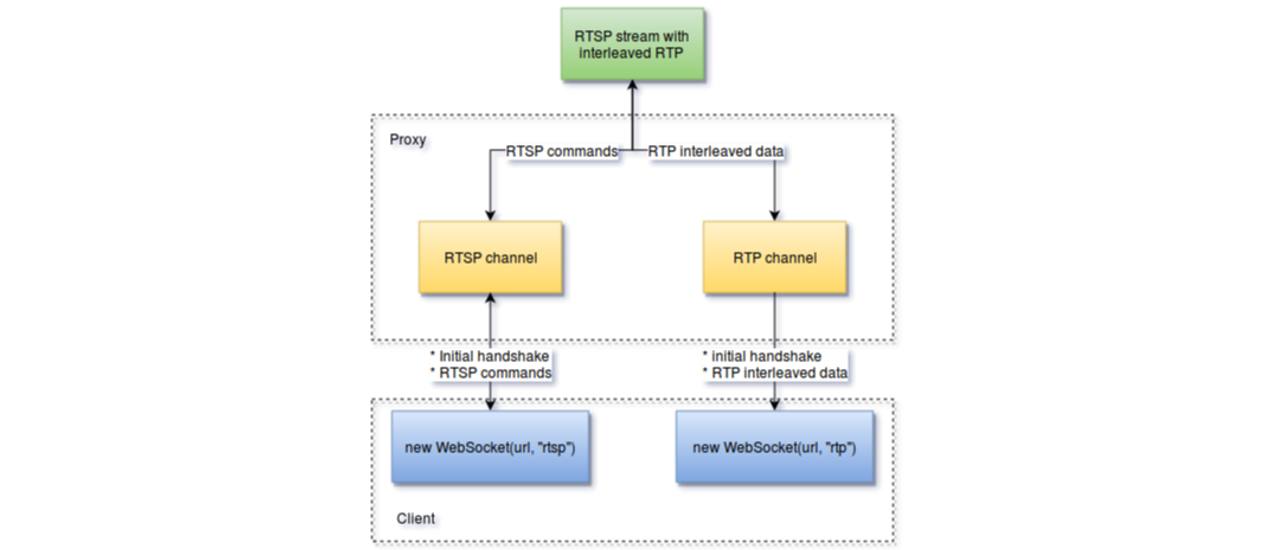
RTSP player establishes connection with proxy with following protocol:
c>s:
WSP/1.1 INIT\r\n
seq: <sequence_id for response tracking>
host: <RTSP stream host>\r\n
port: <RTSP stream port>\r\n\r\n

s>c:
WSP/1.1 200 OK\r\n
seq: <sequence_id for response tracking>
channel: <channel_id>\r\n\r\n

Error codes >= 400 means error
c>s:
WSP/1.1 JOIN\r\n
seq: <sequence_id for response tracking>\r\n
channel: <channel_id achieved from RTSP socket initialization>\r\n\r\n

s>c:
WSP/1.1 200 OK\r\n
seq: <sequence_id for response tracking>\r\n\r\n

Error codes >= 400 means error
c>s:
WSP/1.1 WRAP\r\n
seq: <sequence_id for response tracking>\r\n
\r\n
<RTSP_PROTOCOL_DATA>

s>c:
WSP/1.1 200 OK\r\n
channel: <channel_id>\r\n
\r\n
<RTSP_PROTOCOL_RESPONSE>

Error codes >= 400 means error
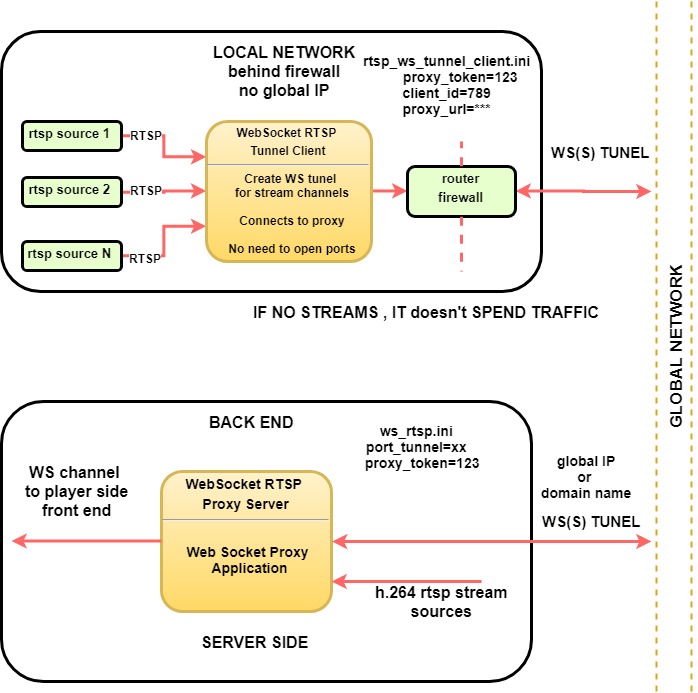
Who will benefit from this solution?
- The ones who has video cameras in the local network, but there is no global IP address to access the cameras from the global network.
- The ones who don't have an option to open the necessary ports on routers and firewalls hidden behind routers.
- Companies that have a remote warehouse or several offices and production premises located in different places of the city. The ability to encrypt the channel (wss tunnel) will allow you to scramble your cameras.
WebSocket RTSP Tunnel Client can be installed:
- to any computer on the local network,
- to one of the most popular boards, for example, RasperiPi or OrangePi,
- flash directly into your router (using an alternative firmware).
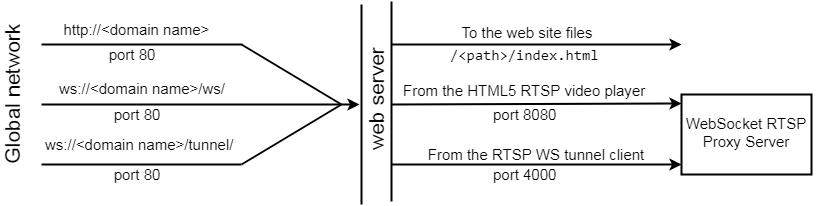
server {
    listen 80;
    server_name <domain name>;

    location / {
	root /srv/proxy/;
	index index.html;
    }

    location = /ws/ {
	proxy_pass http://localhost:8080/ws/;
    }

    location = /tunnel/ {
	proxy_pass http://localhost:4000/tunnel/;
    }
}
For running on raspberry you might need library "libssl1.0.0" or 1.0.1
To install it insert this line in "/etc/apt/sources.list":
deb http://archive.raspbian.org/raspbian stretch main contrib non-freeThen run following command in raspberry terminal:
sudo apt update
sudo apt install libssl1.0.0
Commands to control the tunnel client service
systemctl start rtsp_ws_tunnel_client
systemctl stop rtsp_ws_tunnel_client
At the start you need to setup config parameters /etc/rtsp_ws_tunnel_client.ini
systemctl stop rtsp_ws_tunnel_client
[General]
//RTSP WS tunnel client client id
client_id=RTSP WS tunnel client

//websocket proxy access token - should be the same as on your proxy side
proxy_token=OWJlN2FiMDMtZGEyMC00NGM1LTg5ZDItOGVlMjM

// websocket proxy address - should look to your ws://
//if wss:// - set up "ssl=on" below
proxy_url=ws://192.168.1.180:8088/tunnel/

// RTSP WS tunnel client plugin dir
plugin_path=/usr/lib/rwtc/

// wss connection off - for ws:// | on - for wss://
ssl=off

[CAMERAS] - list your rtsp sources - should be TCP type
url=rtsp://192.168.1.185:554/h264 example rtsp url
url=rtsp://192.168.1.186:554/h264 example rtsp url
url=rtsp://192.168.1.187:554/h264 example rtsp url
url=rtsp://192.168.1.188:554/h264 example rtsp url
url=rtsp://192.168.1.189:554/h264 example rtsp url
You will see this list on the test page when page makes the first connection to the proxy
systemctl start rtsp_ws_tunnel_client
        # path to license file
        license_path=C:\Users\Public\Documents\Streamedian\WS RTSP Proxy Server\wsp.lic
        license_path=C:\Users\Public\Documents\Streamedian\WS RTSP Proxy Server\wsp_two.lic
        license_path=C:\Users\Public\Documents\Streamedian\WS RTSP Proxy Server\wsp_three.lic
        // Tab switching and window minimization processing
        // for browsers that use the chrome rendering engine.
        if (!!window.chrome) {
            document.addEventListener('visibilitychange', function() {
                if(document.visibilityState === 'hidden') {
                    nativePlayer.pause()
                } else {
                    nativePlayer.play();

                    // Automatic jump to buffer end to watch live video when returning to the web page.
                    setTimeout(function() {
                        nativePlayer.currentTime = nativePlayer.buffered.end(0)
                    }, 3000); //  Few seconds delay is required so the player would have time to update the timeline.
                }
            });
        }
Remove this Javascript code from the test page to disable automatic jump to buffer end for live video watching.
<script src="https://cdnjs.cloudflare.com/ajax/libs/p5.js/0.9.0/p5.min.js"></script>
<script src="https://cdnjs.cloudflare.com/ajax/libs/p5.js/0.9.0/addons/p5.dom.min.js"></script>
<script src="https://unpkg.com/ml5@0.4.3/dist/ml5.min.js"></script>
Canvas adding to test page for displaying bounding boxes
<div style="position: relative;">
    <video id="test_video" width="720" height="360" muted autoplay style="position: absolute;"></video>
    <canvas id="test_canvas" style="position: absolute;"></canvas>
</div>
Javascript code for object detection and bounding boxes drawing
let yolo;
let ctx;
let width;
let height;

function initObjectsDetection(playerId, canvasId, rtspLink) {
    const updateTime = 3000; // Interval in milliseconds between image capture for objects detection
    const video = document.getElementById(playerId);
    const canvas = document.getElementById(canvasId);
    ctx = canvas.getContext('2d');
    width = video.offsetWidth;
    height = video.offsetHeight;

    // Resize canvas
    canvas.width = width;
    canvas.height = height;

    // Load Yolo model
    const ml = new ml5.YOLO(video);
    ml.loadModel().then(function(model) {
        yolo = model;

        // Start RTSP link playback
        setPlayerSource(rtspLink);

        // Set interval for objects detection
        setInterval(objectDetect, updateTime);
    });
}

function objectDetect() {
    yolo.detect(function(err, results) {
        if (results !== undefined) {
            // Draw results on canvas
            draw(results);
        }
    });
}

function draw(results) {
    ctx.clearRect(0, 0, width, height);
    ctx.font = "24px helvetica";
    ctx.textBaseline = "top";

    for (let i = 0; i < results.length; i++) { //Iterating through all results
        // Bounding box drawing
        ctx.strokeStyle = "#2fff00";
        ctx.lineWidth = 1;
        ctx.strokeRect(results[i].x * width, results[i].y * height, results[i].w * width, results[i].h * height);


        // Text drawing is last to ensure that it's on top
        const textWidth = ctx.measureText(results[i].label).width;
        const textHeight = parseInt("24px helvetica", 10);
        ctx.fillStyle = "#000000";
        ctx.fillText(results[i].label, results[i].x * width, results[i].y * height - 5);
    }
}
Object detection initialization calling after Streamedian player initialization
var player = Streamedian.player('test_video', playerOptions);
var nativePlayer = document.getElementById('test_video');
var statusText = document.getElementById('statusText');

initObjectsDetection("test_video", "test_canvas", 'rtsp://wowzaec2demo.streamlock.net/vod/mp4:BigBuckBunny_115k.mov');
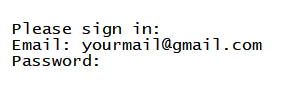
Use this POST request to verify user credentials:
URL: https://streamedian.com/account/api/login/
Data: {"email": "user.email@mail.com", "password": "userpassword"}
Email and password are the same as the ones user was using for registering on the website
{"error": "NoErrors", "message": "User authentication successfully"}
If user email or password is incorrect, then it will cause error code 403 and the response:
{"error": "EmailOrPasswordIsMismatch", "message": "Incorrect email or password."}
If user account is not active, then the response will be:
{"error": 'UserIsNotActive', 'message':'User account is not activated'}
Use this POST request for the activation key assigning to user account:
URL: https://streamedian.com/account/api/assign_activation_key/
Data: {"email": "user.email@mail.com", "password": "userpassword", activation_key: "YWN0aXZhdGlvb***iBrZXk="}
Email and password are the same as the ones user was using for registering on the website
The activation key should be encoded into base64 string!!!
{"error": "NoErrors", "message": "Key assigned successfully"}
If activation key format is incorrect, then it will cause error code 403 and the response:
{"error": 'FormatError', 'message': 'Key does not match the format'}
If activation key is not available, then it will cause error code 403 and the response:
{"error": "NoKeyError", "message": "Key not found"}
If activation key is already assigned another user, then it will cause error code 403 and the response:
{"error": "AlreadyError", "message": "Key already assigned another user"}
Use this POST request to get the available license list:
URL: https://streamedian.com/account/api/licenses/
Data: {"email": "user.email@mail.com", "password": "userpassword"}
Email and password are the same as the ones user was using for registering on the website
{
    "error": "NoErrors",
    "message": "User authentication successfully",
    "licenses": [
        {
            "licese_id": "eeec5567-bd7c-48dc-bd84-28d265b8d361",
            "license_connections": 2,
            "license_expire": "2020-09-29T09:10:50.005Z",
            "machine_id": "",
            "activation_count": 0,
            "license_status": false,
            "version": "3.1",
            "domains": [],
            "attempts_remained": 10
        }
    ]
}
Use this POST request for license activation:
URL: https://streamedian.com/account/api/activate/
Data:
{
    "email": "user.email@mail.com",
    "password": "userpassword",
    "domains": "c3RyZWFtZWRpYW4uY29t",
    "licese_id": "eeec5567-bd7c-48dc-bd84-28d265b8d361",
    "machine_id": "Nkl1QA85aHF2aX9CYUxsTQxTeFoNXRYHYlprcgspagIKL2JBfhc6RH9SAzQ="
}
Email and password are the same as the ones user was using for registering on the website
{"error": "NoErrors", "message": "Activation successfully", "license": "TMxYDNxgj..."}
If license is already activated, then it will cause error code 403 and the response:
{"error": 'AlreadyError', 'message':'License already has an active machine id'}
If activation attempts limit is reached, then it will cause error code 403 and the response:
{"error": 'LimitError', 'message':'Maximum activation amount'}
If license with specified license id is not available, then it will cause error code 403 and the response:
{"error": 'NoLicenseError', 'message':'User license not found'}
Use this POST request for license deactivation:
URL: https://streamedian.com/account/api/deactivate/
Data:
{
    "email": "user.email@mail.com",
    "password": "userpassword",
    "licese_id": "eeec5567-bd7c-48dc-bd84-28d265b8d361",
    "machine_id": "Nkl1QA85aHF2aX9CYUxsTQxTeFoNXRYHYlprcgspagIKL2JBfhc6RH9SAzQ="
}
Email and password are the same as the ones user was using for registering on the website
{"error": "NoErrors", "message": "Deactivation successfully"}
If license is already deactivated, then it will cause error code 403 and the response:
{"error": 'AlreadyError', 'message':'machine id already deactivated'}
If machine id is not specified, then it will cause error code 403 and the response:
{"error": 'MachineIdMismatchError', 'message':'Incorrect machine id'}
If license with specified license id is not available, then it will cause error code 403 and the response:
{"error": 'NoLicenseError', 'message':'User license not found'}
Websocket statistic API provides an ability to receive information about license status and open connections between HTML5 RTSP player and the websocket proxy server.
Follow this instruction to start getting real-time statistic about HTML5 RTSP player connection to the websocket RTSP proxy server.
First step is to connect to the proxy websocket specifying "statistic" subprotocol
ws://localhost:8088/ws/
Note: The websocket rtsp proxy installer installs configuration files for the NGINX and Apache. These configuration files tell webserver to listen 8088 port and forward requests with the "/ws/" path to 8080 port that websocket proxy listens by default. So if you don't use webservers or use your own configuration, then specify port 8080 for connecting to the websocket proxy directly.
Then send next command to websocket to subscribe to update
WSP/1.1 SUBSCRIBE
Authorization: c3RyZWFtZWRpYW4=
seq: 1
The authorization variable is password in Base64 encoding. The default password is "streamedian". To change password enter new password in the "statistic_password" variable in the ws_rtsp.ini file.
If password is incorrect, then you will receive following message:
WSP/1.1 401 Unauthorized
seq: 1
Now when the HTML5 rtsp player is connecting or disconnecting from the websocket rtsp proxy, you will receive an information message from the statistic websocket. This message contains:
User address description:
User address is IP of the user machine from which the connection request comes.
Requested domain description:
The requested domain is an address that was entered into browser for opening of a page with the HTML5 RTSP player.
Also the requested domain is an address that is specified during license activation.
Reason message description:
Example of real-time statistic message:
Please check out the example
{
    "connectionTime": "1611850234",
    "disconnectionTime": "1611850242",
    "reason": "Connection closed",
    "rtsp": {"host": "demo.<yourdomain>.net", "port": "554"},
    "session_id": "127.0.0.1-6 41",
    "user": {"address": "127.0.0.1", "requestedDomain": "http://127.0.0.1:8088"},
    "videoFormat": "h264"
}
A sample code of real-time statistic can be found on the test page.
Follow this instruction to get detailed statistic about licenses and the HTML5 RTSP player connection to the websocket RTSP proxy server.
First step is to connect to the proxy websocket with specifying "statistic" subprotocol
ws://localhost:8088/ws/
Note: The websocket rtsp proxy installer installs configuration files for the NGINX and the Apache also. These configuration files tell webserver to listen 8088 port and forwards requests with the path "/ws/" to the 8080 port that the websocket proxy listens by default. So if you don't use webservers or use your own configuration then specify port 8080 for connecting to the websocket proxy directly.
Then send the next command to websocket to get detailed statistic info
WSP/1.1 GET_INFO
Authorization: c3RyZWFtZWRpYW4=
seq: 1
The authorization variable is password in Base64 encoding. The default password is "streamedian". To change password entry new password in the "statistic_password" variable from the ws_rtsp.ini file.
If the password is incorrect you got message:
WSP/1.1 401 Unauthorized
seq: 1
If request is successful you receive array with licenses information. Each element of array contain information about license, open sessions and number of open sessions.
License information contains:
Sessions information contains array. Each element of array contains:
Example response on detailed information request:
Please check out the example
[
    {
        "license": {
            "key": "277f7886-1ca5-4429-9463-e14a063044cb",
            "expiresAt": "Mon Jul 26 07:00:00 2021\n",
            "maxWatchers": "3"
        },
        "sessions": [
            {
            "rtsp":
                "host": "demo.<yourdomain>.net",
                "port": "554"
            },
            "user": {
                "address": "127.0.0.1",
                "requestedDomain": "http://127.0.0.1:8088"
            },
            "connectionTime": "1611942677",
            "session_id": "127.0.0.1-2 18467",
            "videoFormat": "h264"
            }
        ],
        "sessionNumber": "1"
    }
]
A sample code of detailed statistic can be found on the test page.
Simple logging examples using python 3 and nodejs
Python 3First step is the websockets library install
pip install websockets
Sample python code to write statistic to file
#!/usr/bin/env python

import asyncio
import websockets
import base64

def write_to_file(path, response):
    with open(path, '+a', encoding='utf-8') as file:
        file.write(response)

async def statistic():
    uri = 'ws://localhost:8088/ws/'
    password = base64.b64encode(b'streamedian').decode('utf-8')
    path = 'ws_proxy_statistic.txt'

    async with websockets.connect(uri, subprotocols=['statistic']) as websocket:
        cmd = 'WSP/1.1 SUBSCRIBE\nAuthorization: {}\nseq: 1\n\n'.format(password)
        await websocket.send(cmd)

        while True:
            response = await websocket.recv()
            write_to_file(path, response)

asyncio.get_event_loop().run_until_complete(statistic())
Node.js
Sample nodejs code to write statistic to file
const WebSocket = require('ws');
const fs = require('fs');

const stream = fs.createWriteStream("ws_proxy_statistic.txt", {flags:'a'});
const ws = new WebSocket('ws://localhost:8088/ws/', ['statistic']);
const password = Buffer.from('streamedian').toString('base64');

ws.on('open', function open() {
	ws.send(`WSP/1.1 SUBSCRIBE\nAuthorization: ${password}\nseq: 1\n\n`);
});

ws.on('message', function incoming(data) {
	stream.write(data);
 	console.log(data);
});
This license is suitable for docker users that would like to run many docker images at the same time.
Separate license is necessary because every time when docker container recreated the machine id of this container changes.
And it leads to reactivating the license, but the number of license activation is limited.
Multi docker license doesn't bind to machine id. So this license remains valid after container recreation.
Also you could create any number of containers with one multi docker license file. This license is supported since websocket rtsp proxy version 1.8.6
If you would like to use this custom license, then please contact us
The H265 feature is available immediately after the websocket rtsp proxy installation. Free license supports 3 simultaneously viewed streams and the test page will work in the local network only. For using of global domain name or your web page from global network it's necessary to activate free or regular license to enable supporting of H265 streaming. Please use the free license first to make sure that our product works successfully with your video stream source before purchasing a license. Note that when counting the number of opened connections (users watching), it does not take into account the type of stream.
Before recording start it's necessary to setup the callback to receive a recorded video. The callback receives two arguments "data" and "prefix". The "data" is a buffer that contains recorded video and audio in the mp4 container. The "prefix" depends on who made the recording, it may be "continuous" or "event". The callback will be called when recording is stopped or if recording time is longer than the file length.
Follow the example to setup callback and download recorded video:
        // Create the html link element. We will use it to download the file further down the line
        var link = document.createElement('a');

        // Callback to receive and handle recorded video file
        var dataHandler = function(data, prefix) {
            // Create the Blob so we can download the video as a file
            let blob = new Blob([data], {type: "application/mp4"});
            // Create object link and set it to the HTML link element
            link.href = window.URL.createObjectURL(blob);
            // Set file name
            link.download = `${prefix}_${new Date()}.mp4`;
            // Call click method. Like a user clicked on a download link
            link.click();
        }

        // Options for HTML5 RTSP Player
        var playerOptions = {
            socket: "ws://localhost:8088/ws/",
            // Set callback to receive recorded video
            dataHandler: dataHandler,
        };

        // Set the player options to the HTML5 RTSP player
        player = Streamedian.player("VideoElementId", playerOptions);
        player.continuousRecording.record(true);
        player.eventRecording.record(true);
To stop recording call the "record" method with the parameter "false".
Also recording will be automatically stopped when the player page closes or player is paused.
The file length value is the time in milliseconds of one file recording. If the recording time is longer than the file length value, then "datahandler" callback will be called with the recorded video fragment. And the recording will continue for the next video fragment recording. Default file length is 3 minutes.
The file length can be specified in the HTML5 RTSP player config. The example:
        var playerOptions = {
            socket: "ws://localhost:8088/ws/",
            bufferDuration: 30,
            errorHandler: errHandler,
            infoHandler: infHandler,
            dataHandler: dataHandler,
            continuousFileLength: 180000, // 3 minutes
            eventFileLength: 10000, // 10 seconds
        };
Or using the "setFileLength" method. The example:
        player.continuousRecording.setFileLength(180000); // 3 minutes
        player.eventRecording.setFileLength(10000); // 10 seconds
Note: The file length must be set before recording starts.
Otherwise file length value will not be applied to the current recording.
        continuousFileLengthInput.value = player.continuousRecording.fileLength;
        eventFileLengthInput.value = player.eventRecording.fileLength;
A sample code of recording and downloading video can be found on the test page.
